Sheet Metal Welding Design Guide: Joints, Fit-Up, and Distortion Control
Sheet Metal Welding Design Guide: Joints, Fit-Up, and Distortion Control
Welding sheet metal is a balance. You want a strong, leak-free joint, but a weld is heat — and heat makes thin metal move, distort, and warp. Many parts that are “perfect” in CAD come out of the weld bay looking like a potato chip.
The good news: most distortion is predictable and preventable with the right joint design and a bit of planning.
Pick the right joint
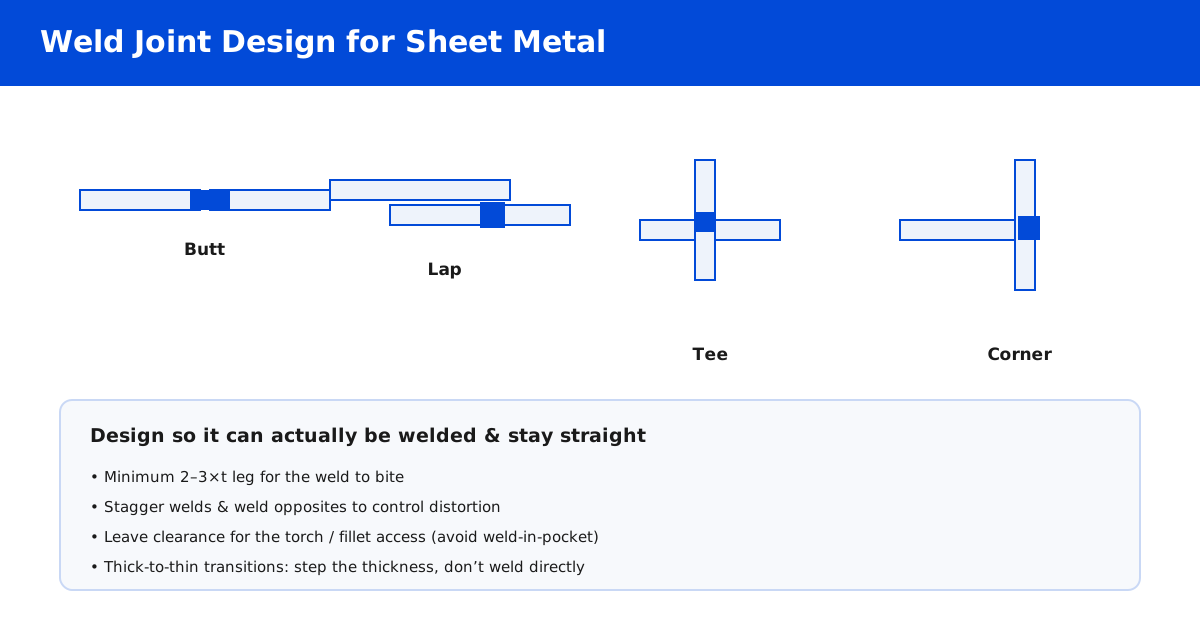
The joint type drives strength, cost, and how easy it is to control distortion.
| Joint | Typical use | Notes |
|---|---|---|
| Butt | Flat joins, structural | Add a gap for penetration, but watch fit-up |
| Lap | Overlapping sheets, panels | Strong and easy, but a stress riser at the edge |
| Tee / T-joint | Ribs, flanges to walls | Most common; add a fillet on the easy side |
| Corner | Enclosures, boxes | Good for clean corners, less area to distort |
The joint design rules that actually matter
1. Give the weld room to bite
A weld needs a certain leg length to be strong. As a rule of thumb, aim for a fillet leg of at least 2–3 × t on the thinner member. If the flange is too short, the weld can’t get a proper grip.
2. Leave fit-up clearance
Good fit-up is essential, but “perfect fit” is a myth. Leave a small gap (typically 0.5–1 mm) for the weld to penetrate. A tight fit-up with no gap causes poor penetration and burn-through.
3. Get torch access
If you design a weld deep inside a pocket or a corner with no room for a torch, you’ll get a “weld-in-pocket” that nobody can actually reach. Leave enough access for the welding torch and the operator’s hands.
4. Match thickness at transitions
Welding a thick plate to a thin sheet directly is a recipe for burn-through on the thin side and lack of fusion on the thick side. Where possible, step the thickness or add a transition piece instead of welding thick-to-thin head-on.
Distortion: the real enemy
Heat input makes metal expand and contract. On thin sheet, this is obvious — the part warps, twists, or bows after welding.
Types of distortion
- Angular distortion — parts bend at the weld
- Longitudinal distortion — long parts bow along their length
- Residual stress — builds up after welding and can crack thin parts
How to control it
- Weld opposite sides — balancing the heat lets the part pull straight.
- Stagger the welds — alternate along a seam instead of running a single long weld.
- Use intermittent (stitch) welds — less heat, less distortion, often enough for sheet metal.
- Weld the shortest, stiffest path — order matters; weld the parts that least distort first.
- Use fixturing — clamp or jig the part so it can’t move.
- Fit-up before welding — tack the part, check alignment, then run the weld.
Post-weld options
If distortion is unavoidable (long, open, or asymmetric parts), you can:
- Straighten mechanically — press or roll-correct after welding
- Stress-relieve — heat-treat or vibration to relieve residual stress
- Machine critical faces after welding — the cleanest way to get precise final dimensions
A practical sequence for a welded enclosure
- Confirm material and thickness.
- Decide joint types — where you want clean edges and where you need strength.
- Leave fit-up gaps and torch access.
- Plan the weld sequence (staggered, opposite sides).
- Design critical machined faces to be finished after welding.
- Specify a tolerance that accepts the reality of a welded assembly.
When not to weld
If you don’t need a permanent, sealed joint, consider alternatives that avoid the heat entirely:
- Self-clinching hardware — inserts and studs pressed in, no heat
- Rivets and screws — easily serviceable
- Formed snap-fits — no joining at all
- Adhesives — for sealing and cosmetic joins
Welding is great for strength and sealing, but it’s not always the fastest or cheapest route.
FAQ
Why does my thin sheet metal warp after welding?
Because heat makes it expand and contract unevenly. Use smaller, staggered welds, weld opposite sides, and fixture the part.
What’s the minimum flange for a weld?
Aim for at least 2–3 × t so the weld can get a proper grip. Shorter flanges are hard to weld and weaker.
Can I weld thick to thin sheet metal?
Yes, but it’s risky. Step the thickness, or add a transition so you’re not welding 6 mm to 1 mm directly.
Should I machine after welding?
If you need precise final dimensions, yes. Machine critical faces after welding to correct distortion.
Related reading:
- Sheet Metal Welding Fabrication: Techniques and Applications
- Sheet Metal Tolerances: What You Can Actually Achieve
- How to Fasten Sheet Metal: Inserts, Rivets, and Joining
A weld is only as good as its design. If you’re working out a welded assembly and want a second opinion on joints and distortion, send us the drawing.